
12 Hottest Gel Nail Trends You Need to Try Right Now

If you’re a gel nail obsessive, you already know the rush — that ultra-glossy, chip-resistant finish that holds up for weeks. But right now, gel manicures are getting a serious upgrade: think rich textures, mesmerizing depth, and optical illusions that only gel can pull off. From the effortlessly chic Pearly Nude to the futuristic Chrome Shimmer, your next manicure is about to do a whole lot more.
Whether you’re a home DIY gel queen with a UV lamp or hunting for fresh inspo to bring to your nail tech, we’ve rounded up the 12 hottest gel nail trends taking over right now. Let’s get into it.
1. Pearly Nude Gel
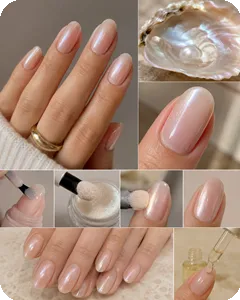
Think “quiet luxury” meets “glazed donut” — but make it evolved. This look layers a semi-sheer, milky nude base with a soft pearlescent glow that catches light like the inside of a seashell. It’s timeless, universally flattering, and looks wildly expensive without trying.
How to get it: Start with a sheer nude gel base (OPI “Bubble Bath” is a go-to) or a natural-toned builder gel. Cure it, then buff a white pearl chrome powder over the tacky layer. Or skip the steps entirely with a built-in pearl finish polish like Gelish “Tan My Hide.”
Pro tip: Since the base is sheer, this grows out beautifully. Keep cuticles hydrated daily with nail oil — light shades put your nail bed front and center.
2. Pastel Ombre Gel
Why commit to one color when you can wear a sunset? This seamless, airbrushed gradient blends two dreamy pastels — think mint fading into lavender — for a soft, editorial look that’s honestly stunning in person.
How to get it: Grab a makeup sponge and two pastel gel polishes (Beetles Gel Polish pastel sets are perfect). Apply the lighter shade all over and cure. Paint both colors in stripes on the sponge, then dab onto the nail. Repeat until opaque, cure, and finish with a glossy top coat to blur the blend.
Pro tip: Tip wear is barely noticeable on ombre. Protect from prolonged sun exposure — some pastel gels can yellow over time.
3. Glossy Gel with Clear Tips
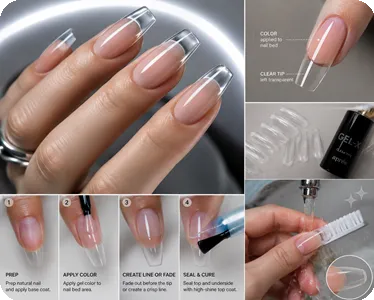
Modern, architectural, and impossibly cool. Using gel extensions (Gel-X style), the tip is left completely clear while the nail bed gets a solid or nude color. The result? Glass-like nails that look like they belong in a sci-fi film.
How to get it: Use clear Aprés Gel-X tips or clear builder gel forms. Apply your chosen gel only to the nail bed, either fading it out before the free edge or making a clean, crisp line. Seal everything — including the underside — with a high-shine top coat.
Pro tip: Clear tips show everything underneath. Clean the underside daily with a nail brush and soap to keep them crystal clean.
4. Metallic Accent Gel
Neutral nails, but make them editorial. A beige, taupe, or dusty pink base becomes the canvas for fluid gold or silver metallic accents — think drips, swirls, or a modern French outline. It’s nail jewelry without the bulk.
How to get it: Apply and cure your neutral gel base. Use a metallic painting gel (Madam Glam has great options) or apply a chrome powder over a design drawn with top coat. Both methods create that molten metal effect.
Pro tip: Seal the free edge with an extra layer of top coat — that’s where metallic finishes tend to wear first.
5. Icy Gel Pastels
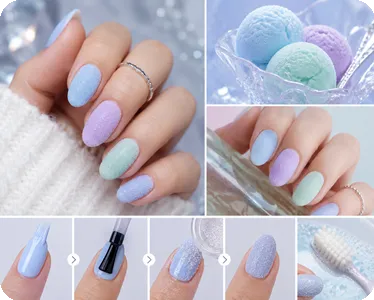
Cool-girl energy, literally. Baby blue, lilac, and mint get a frosted or “sugared” finish that makes your nails look like sorbet. It’s crisp, fresh, and the kind of mani that people will ask about constantly.
How to get it: Apply your cool-toned pastel gel of choice. For a frosted finish, seal with a Matte Gel Top Coat. For the sugared effect, sprinkle fine clear glitter over the wet top coat before curing — and don’t apply another layer on top.
Pro tip: Matte and textured finishes show dirt more easily. A quick scrub with a soft toothbrush and soapy water keeps them looking fresh.
6. Chrome Shimmer Gel
The it-girl nail trend of the moment. A sheer pastel or neutral base gets topped with aurora or unicorn chrome powder for a color-shifting, soap-bubble shimmer that is truly unlike anything else.
How to get it: Apply a sheer base gel. Follow with a no-wipe top coat, cure for 30 seconds, then buff in Aurora or Unicorn Chrome Powder with a sponge applicator. Dust off the excess and seal with a final top coat layer.
Pro tip: Chrome powders chip at the free edge if not properly sealed. Use builder gel or two layers of top coat for lasting wear — and gloves for heavy-duty chores.
7. Moonlight Minimalist
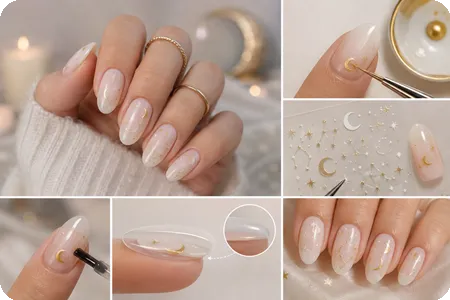
Celestial nail art for the understated crowd. A soft, milky base gets delicate hand-painted moons, stars, or constellations in gold or white. Subtle enough for work, magical enough for a night out.
How to get it: Use a milky white or sheer pink base. With a fine liner brush and gold gel paint, place tiny crescent moons near the cuticle. Not feeling freehand? Deco Beauty makes beautiful celestial stickers.
Pro tip: If using stickers, fully encapsulate them in a thick layer of top coat so the edges don’t lift over time.
8. Minimal Line Art
Abstract, artsy, and high-end without trying. A clear or nude base is dressed up with fine, flowing lines in black or white — swirls, faces, geometric shapes, whatever feels right.
How to get it: Start with a matte or glossy nude base. Use a spider gel for perfectly taut straight lines, or a fine liner brush for organic, hand-drawn swirls. Cure and seal.
Pro tip: Protect fine line work with a durable top coat. Light nude bases can stain from things like curry or hair dye — keep that in mind.
9. 3D Floral Gel Art
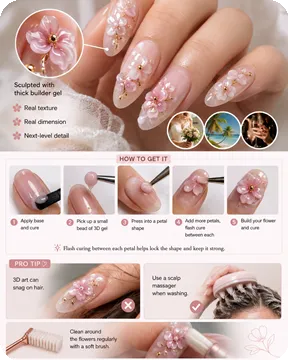
This isn’t a sticker. Tiny petals are sculpted directly onto the nail with thick building gel, creating flowers with real texture and dimension. It’s next-level impressive and perfect for weddings, vacations, or any time you want to feel fancy.
How to get it: After applying your base, use a 3D Sculpture Gel or thick builder gel. Pick up a small bead, press it into a petal shape with your brush, and flash cure between each petal to lock the shape.
Pro tip: 3D art can snag on hair — use a scalp massager when washing and clean around the flowers regularly with a soft brush.
10. Candy Stripe Nails
Preppy, playful, and just a little nostalgic. Thin vertical stripes in pastel gel over a sheer “jelly” base look like hard candy — or the chicest pinstripe you’ve ever seen.
How to get it: Apply a sheer pink jelly base. Use a long striper brush to paint vertical lines, flash curing each one before starting the next so colors don’t bleed. Mix up the colors for a true candy effect.
Pro tip: Stripes visually elongate the nail. Seal the free edge well — tip wear shows on stripes more than most other designs.
11. Gemstone Accents
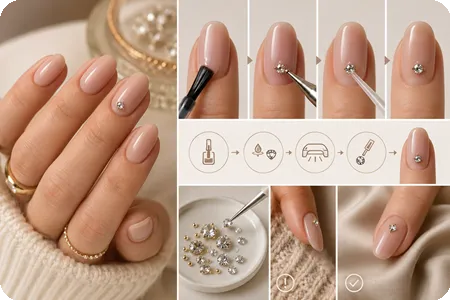
Built-in jewelry, no extra effort required. One tiny crystal or a curated cluster near the cuticle turns a simple neutral gel mani into something that belongs on a luxury mood board.
How to get it: After applying your gel color, use a dot of structure gel or gem glue to set your rhinestone in place and cure. Secure it further by applying top coat around the base of the gem — not over it.
Pro tip: If a gem starts to feel loose, apply a tiny dot of top coat around its base and cure again. Avoid snagging on knits or delicate fabrics.
12. Swirl Gel Design
The retro revival is not slowing down. Psychedelic swirls in pastel pink, lilac, and blue flow across a nude base — and the smooth consistency of gel makes the curves look like they were printed on, not painted.
How to get it: Apply a nude base. Use a liner brush and 2–3 pastel gel shades to paint loose, organic “S” curves across the nail. One of gel’s best perks: wipe it off and start over before curing if the swirl isn’t hitting right.
Pro tip: The busy pattern is incredibly forgiving of chips. Keep the finish glossy to maintain that liquid, flowing look.