
How to Draw on Black Paper with Colored Pencils
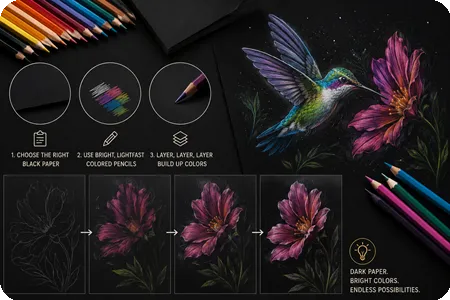
If you’ve only ever drawn on white paper, you’re missing out on one of the most dramatic effects in colored pencil art. Drawing on black paper transforms your artwork into something bold, vivid, and truly eye-catching. In this beginner-friendly guide, we’ll walk you through everything you need to know — from choosing the right pencils to mastering the layering technique that makes colors pop on dark surfaces.
Why Draw on Black Paper?
White paper makes colors look bright and clean, and highlights are easy to achieve. Black paper flips the script entirely. Instead of adding shadows, you build up the light — which creates a natural depth and drama that’s hard to replicate any other way.
The catch? Black paper absorbs color, so the brightness of your pencils gets muted if you apply them directly. That’s where technique comes in.
Choosing the Right Colored Pencils
Not all colored pencils perform equally on black paper. The key quality to look for is opacity — how well a pencil covers the surface rather than letting the dark paper show through.
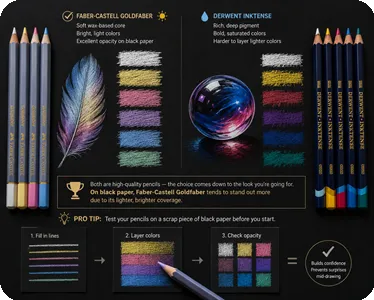
Two excellent options to consider:
- Faber-Castell Goldfaber – Soft wax-based core that transfers color easily and delivers bright, light hues. These perform especially well on black paper because of their lighter overall tone.
- Derwent Inktense – Rich, deep pigment with beautiful intensity. Slightly harder to layer lighter colors on top of, but stunning for bold, saturated areas.
Both are high-quality pencils — the choice really comes down to the look you’re going for. On black paper, Faber-Castell Goldfaber tends to stand out more due to its lighter, brighter coverage.
Pro tip: Before you start any drawing, test your pencils on a scrap piece of black paper. Fill in lines, layer colors on top of each other, and get a feel for how opaque each one is. This builds confidence and prevents surprises mid-drawing.
The Core Technique: Layering
The most important technique for drawing on black paper is layering — applying multiple thin, gentle layers of color on top of one another to build up opacity and richness.
Here’s what makes it work:
- Always use light pressure and soft strokes when starting out
- Build color gradually rather than pressing hard right away
- Start with white as your base layer in the lightest areas before adding other colors
- Leave your darkest areas black — the paper does that work for you
One critical note: unlike graphite or lead pencils, colored pencils can’t really be erased. So always sketch your outline lightly in regular pencil first. On black paper, pencil marks are barely visible, easy to erase, and you can color right over them.
The Power of White Pencil on Black Paper
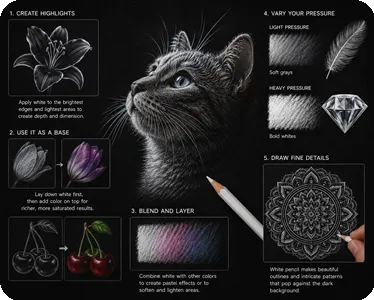
White colored pencil is your secret weapon on black paper. It creates stunning contrast, adds highlights, and acts as a base layer that makes your other colors appear more vivid and opaque.
Here’s how to use it effectively:
- Create highlights – Apply white to the brightest edges and lightest areas of your subject to create depth and dimension
- Use it as a base – Lay down white first, then add color on top for richer, more saturated results
- Blend and layer – Combine white with other colors to create pastel effects or to soften and lighten areas
- Vary your pressure – Light pressure creates soft grays; heavier pressure builds up bold whites
- Draw fine details – White pencil makes beautiful outlines and intricate patterns that pop against the dark background
Step-by-Step Tutorial: Drawing a Parrot on Black Paper
Step 1 – Sketch Your Outline
Study your subject carefully before touching pencil to paper. Then lightly sketch the outline using a regular graphite pencil, noting where your highlights and shadow areas fall. Don’t worry about the pencil lines — they blend right into black paper and can be erased easily.
Step 2 – Fill In White Areas
Using your white colored pencil, define all the lightest and brightest areas of your subject. Apply several layers in these spots to build up opacity. Leave the darkest areas completely black — the paper handles those naturally.
For the parrot: Apply white across the plumage as a base for bright colors. Add extra white on the top of the head and beak where the light hits hardest. Leave the area around the eye black.
Step 3 – Add Your First Layer of Color
Layer your lightest color onto the white base. Use small circular motions for a smooth, blended look, or try hatching and cross-hatching for a more textured feel.
For the parrot: Layer yellow over the beak and chest area.
Step 4 – Build Up Your Colors
Move to your next color and continue building layers. Work from the side opposite your dominant hand — right-handers should work from the top left corner downward. This keeps your hand off completed areas and prevents smudging.
For the parrot: Add red and orange to the beak, keeping the white highlight on top. Use deep purple for shadows on the underside of the beak.
Step 5 – Continue Layering
Keep filling in colored areas, gradually building toward your final tones.
For the parrot: Layer light blue over the white on the head, working toward a bright, vivid blue.
Step 6 – Add Final Details
Finish any remaining areas and refine the details that bring your drawing to life.
For the parrot: Add green to the plumage and work detail into the eye.
One More Trick: Use Black Pencil on Black Paper
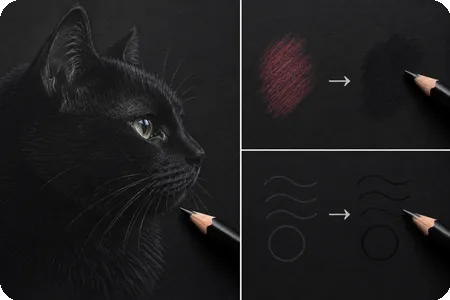
This sounds counterintuitive, but going over areas with a black colored pencil deepens the black of the paper and helps define crisp outlines. It’s also a great way to “erase” a colored pencil mistake — simply layer black over the area to cover it up.
Final Thoughts
Drawing on black paper with colored pencils is a rewarding technique that produces stunning, high-contrast artwork. The key takeaways are simple: start with white, build in layers, use gentle strokes, and let the black paper do the heavy lifting in your shadow areas. Once you get the hang of it, you’ll find yourself reaching for black paper again and again.
Ready to give it a try? Grab your pencils, pick a subject, and start layering!